Thursday, February 4, 2010
Scrap Busting, Stash Busting
Choosing the Yarn
I did mention in the last blog that I choose a couple of colors that I like together. I then start pulling skeins of all the different shades of those colors that I own(including partial skeins). After that I start grabbing some skeins of neutral colors that I think will look nice with the main colors I have chosen. I try to smoosh all the yarn together in a big pile end up to keep the labels from distracting your eyes from seeing the what all the colors look like together. When you do this you will usually see some yarns that just don't seem to belong, go ahead and remove those now.
An Alternative
You can also do this with different shades, or just different textures of one color. For example, an afghan in all whites in different textured yarns is extremely striking.
Every Yarn in it's Place
There are a couple methods in which you can place your yarns. First I will mention the daring way. You can put all of your yarn in a bag, close your eyes, pull out a skein, and use it next. This is personally a little to daring for me, so now I will share my method of organization.
My Method of Madness
I work from the edges in. The way I do this is by scanning my yarn. I try to locate two yarns of the same color, they can be the same type of yarn as each other, or very similar shades but different yarns. I place these yarns far apart from one another. I scan my yarn again looking for a color that looks good next to the yarn I just put down. I try to find another yarn of the similar color of the new yarn and place these just inside of the two you have already put down. Now repeat the last step, placing the two new yarns on the inside of the last two you placed. If there is a yarn that you find very striking and want it to be in the center, place it there now. You can continue by working in towards the center, or if you have chosen your center, back out towards the edges. Once you are finished, working across the skeins from the end you want to start on, take a sharpie and write numbers on you labels, 1-? I also like to get several large ziplocks and number them. I usually have 5-7 skeins in each ziplock. This way you can travel easier with this project taking only the next few skeins that you will be using. The purpose of placing them this way is to give the afghan a feeling of balance. So your eye travels rather than being sucked in to one area of the afghan.
Things to Consider When Placing your yarn
*If you don't have two different yarns of the same color, feel free to split a skein in half by rolling it into two balls.
*Use all weights of yarn if they are lighter than worsted you can double them, or run them with another yarn of your choice. I commonly triple fine mohair, or double light weight cottons. I use a U.S.10.5 size needle on all of mine, but if *you have heavier yarns feel free to use an U.S.11.
*You can use up partial skeins very easily in this project.
*Don't be afraid to add textured yarns like eyelash, boucle, or flagged yarns they add a great deal of depth!
Blanket Info
*I use a U.S. 10.5
*My basic amount of stitches are 175 throughout
*When changing colors, if the public side is facing you knit 1 row. If the private side is facing you purl 1 row
*When changing stitches, if you need to increase or decrease before starting the stitch, do this on the first row of a color change (that row should always be knitted or purled across)
*You can consider this blanket a sampler of stitches, I typically change stitches each time I change yarn. Suggestions for stitches can be found below, and in the following blog updates. :)
*If you want to try a stitch but are afraid of putting in on your blanket without trying it do a small swatch of it in the yarn you are planning to use.
*I am using a few books to find stitches for some of my blanket (you do not need them) but if you like any stitch that I am doing at least you will find the name of the book for each stitch I do just in case you want to purchase it for yourself, though most are classic and can be found free on the internet.
Resources are as follows: A Second Treasury of Knitting Patterns by Barbara Walker
Vogue Knitting Stitchionary
Vogue Knitting Stitchionary 2
Getting Started Yea!!!!
Finally :) Okay so now the meat and potatoes. You can make this afghan with just Garter,and stockinette.. but this is a perfect project for learning stitches or just playing that being said do what you are comfortable with. First lets take out yarn number one, is it smooth, slightly textured, or textured? Certain textures on yarn will show off some stitches better than others. For example Smooth works great with more textured stitches like cables, bobbles and cords. Slightly textured can look nice in simple patterns like garter, stockinette, seed, linen, and ribs, while I wouldn't bother doing anything other than garter, or stockinette with textures like eyelash. I will be recording my progress here on blogs as I go. I will state the kind of texture my yarn is, the stitch I used, the source of the stitch if I got it from a book, and the amount of stitches my blanket currently has. If any of you have a hard time with knowing how many to increase or decrease for a stitch let me know and I will be happy to help you till you get the hang of it. I will go through the math as we need to change stitches the those of you that haven't done this type of thing before.
Note: The following patterns are just what I decided to use. Please feel free to use which ever patterns you like. I happen to be starting with a pattern from a book, but around half of the time I am not using patterns from any book they are simple. I will list yarns that I still have the labels for. My next post will be of the next few yarns.
Casting On
Yarn #1
Slightly Textured Cartridge-Belt Rib from A Second Treasury of Knitting Patterns By Barbara Walker
I chose this pattern because it does not contract like a rib, and starts the blanket out with some great texture. I casted on 223, and used up all of the the first yarn which was 2 1/2".
Yarn #2
Textured 2 Rows of Reverse Stockinette
I purposely make textured sections really thin, so they dont overwhelmed my stitch work in the rest of the blanket. Just food for thought for when you use a textured yarn.
Yarn #3
Smooth Texture,
I had 1 row reverse stockinette, 4 rows stockinette, 1 row reverse stockinette.
Yarn #4 Trendsetter Filosophy
Smooth ribbon Linen stitch 1"
Friday, January 29, 2010
Off Track... On Stash Busting

I don't like when my finished objects look like they are made from scrap,so these afghans are made in a way that gives you a very purposeful look. I welcome you to join in the stash busting, if you are on Ravelry and join in-try to post your photos in your project pages, I can put them on the blog here if you would like to share your progress, or they can be any of your own stash busting projects or ideas.

These projects are perfect if you tend to purchase the same colors over and over again.
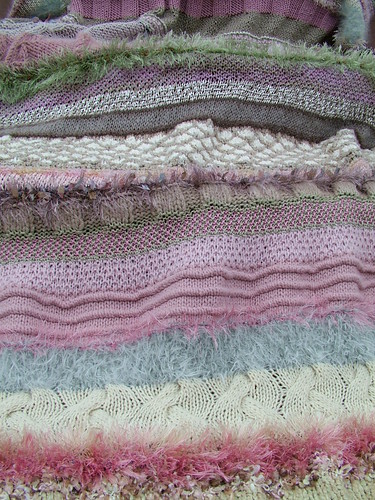
This afghan can be as simple or difficult as you want to make it. I will be walking through everything from selecting the yarn to be used, to finishing the afghan. I will be giving many tips to help you along on yours should you make one. The photos above are examples of what you can do. I have made a few of these and LOVE them. Every one of them turns out pretty and they are an exciting knit. Below I am including photos of the yarn I will be using, with some tips of how to choose your yarn, and a little information to get ready for us to begin. I will begin knitting next week!
The first thing I do when choosing yarn for this afghan is look at my colors overall. I tend to have the best luck when I choose two colors, and neutrals. for example, in this case I have chosen aqua and blue. I will go through my stash grabbing a skein of each aqua and blue (choose different shades light and dark) that I have. I then grab one skein of each of the neutrals (whites, creams, taupe, brown, black) I set these on end and smoosh all the yarn together in a pile so I don't have the labels distracting my eyes from the colors. I now remove any yarns that don't look good in the pile. It is best to have between 15-25 skeins for this project. Partial skeins are perfect for this project too so don't forget about them!
Next week we will organize and start knitting!
Tuesday, January 5, 2010
Starting Out the New Year With Organization
So..... I will document here what I am making and how, just in case anyone else wants to organize as well.
Today I will start with a fabric covered journal. I make them for keeping track of my projects, and handspun yarn. Next time I will be making a circular needle case. I will apologize in advance for the lack of photos this time around.. My camaras batteries were dying... I will have much more detailed photos of the needle cases. This is a very easy project though so don't worry.
Materials:
Three ring binder
Two types of fabric I bought 2 yards of each, so I have enough for matching needle cases.
Quilt Batting enough to cover the binder
Two Yards of trim
Scissors
Spray on adhesive
Hot glue gun/glue sticks
Thin poster board or cardboard
Iron
Unopened trash bags
Ruler
Pen or pencil
Preparing your fabric: Iron your fabric to remove any creases. Lay the fabric (for the outside of the binder) right side down on a flat surface, place your binder (open) on your fabric then cut your fabric 1 1/2" larger than the binder on each side. Lay your binder (open) on the quilt batting in the same manner, and cut batting 1" larger then binder on all sides. Measure the front cover of your 3 ring binder. Record these measurements, subtracting a 1/2" vertically and horizontally.
Covering your binder: Unfold, but don't open your trash bag. Lay it out flat in a well ventilated area. Lay your quilt batting on the center of your trash bag. Spray your spray adhesive on the surface of the quilt batting. Carefully lay your binder (closed) on the batting. Smooth the batting on your binder slowly removing any wrinkles that occur.
Fold the edges in, and smooth them on to the inside of the binder. Let your binder dry, then repeat this step for the fabric
Tip: For cleaner corners, after smoothing one side of the fabric to the inside of the binder, cut the fabric at an angle, and then smooth down the other side.
Preparing the inside fabric: Now take out your poster board, and the fabric for the inside of the binder. Lay the fabric right side down. Now lets prepare the poster board. Cut out two rectangles using the measurements you recorded earlier... Place one of them on your fabric and cut the fabric out leaving 3/4" of extra fabric on each side. Before cutting the other piece of fabric look at the inside of your binder. If the rings are connected to edge, without leaving much extra space, you can cut your other fabric to the same measurements of your other inside fabric.
Note: Some notebooks have a lot of space between where the rings attach to the folder, and the bend of the folder. In this case, I cut the fabric leaving 3/4" on three sides, and leave extra fabric on the remaining side, to accomidate this extra space.
Gluing the inside pieces: Glue the inside pieces around the poster board, turning in the edges as you did with the outside. Let them dry. Note: If you do have a binder with a lot of space between the bend and the rings, when you fold over the edges of the fabric, fold over three sides, the other side will adhere to the binder to cover the space left in that bend. The other piece will be covered normally with all four edges folded over the back of the poster board. Let these pieces dry.
Adhering the inner fabric: Spray the back side of the poster board with the spray adhesive, then center and stick them to the inside of the binder covers. Note if you have the binder with extra space, smooth the extra fabric in towards the center of the binder. trim the extra fabric and tuck the edge under the metal joining.
Finishing touches. Now hot glue on the trim :) Yea we are finished.
Further considerations may include page protectors, and business card sheets. Below are photos and a few notes on the records I keep.
I try to record my projects in detail.
For knitting, crochet, and tatting. I will include a photo of the finished project, the pattern source.. ex: the name of the book. If it was a downloaded pattern, I slide it in a page protector attached to the project photo. I include the yarn information, needle and hook sizes used, note any changes I made to the pattern, who I gave it to, and note how well I liked doing the project. As silly as this may sound, it is very useful. I often remember when someone asks me to make them something I have made before.. thinking I really didn't like doing it the first time.. but it couldn't have been that bad I finished it..... Then half way into the project I discover what I disliked about it in the first place. I know there are several "never again" items, I have been suckered into.
For Spinning: I record my fiber source, the colorway, fiber components, amount, whether it is a reproducable colorway, predrafting instuctions, ratio, plying info, and how much yardage I produced.. I also wrap a little fiber, a single, and my finished yarn around a cut up 3 x5 card and stick it to the page. I then slide this into a page protector. When I finish a project with it, I finish project page (like in the above section), and add a photo.
Ohh I like adding a page for business cards.. to be able to find my sources more easily:) Here is an example
I hope you can get some use out of this.
Enjoy :)
Monday, November 30, 2009
Gingerbread Fun!
1: a premade gingerbread house that we provided had to be incoporated somehow.
2: Everything had to be edible.. except mechanical devices such as lights, and hinges etc..
3: All decorating had to be done on Thanksgiving evening when we were all together.
Here is a photo of each of the houses. From last place to first. P.S. all photos can be enlarged (alot) by clicking on them.
Tuesday, November 3, 2009

Hello again : )
I just wanted to share a bit about the designer, that let us use her Cabled Hat pattern for our last Mystery KAL. She is a wonderful designer, and her name is Meg White. She offers several designs on Ravelry.com. This designer spotlight is more of an interview.
You can find Meg White on Ravelry as Turbo. She also has a blog http://www.thekninja.blogspot.com/
Me: When did you start knitting?
Meg: My mother tried to teach me when I was very young, and a roommate in college showed me a hat she was working on, but it just didn’t stick with me. I didn’t quite get it, or maybe I wasn’t interested then. I think, really, it was a little knit bikini in “Bust” magazine that suck in my head.
One day, walking through a flea market, I picked up a ball of yarn and needles for $3. Why? I didn’t have any real intention of ever knitting at the time. That was a Sunday. On Tuesday I broke my leg. Lying on the couch, wondering what to do, I picked up the needles and yarn and started knitting. Yes, I just started knitting – and purling. Bizarre, huh? Somehow this latent knowledge had stuck in my brain along the way and came to me unexpectedly when I needed it most.
I bought more yarn and the “Stich’n Bitch” book, coincidently by Debbie Stoller also, clearly the godmother of my knitting. My first project was a scarf with random stripes and my second a baby blanket that turned out larger than expected. After the big blanket I figured I might as well go for a sweater and knit up a cabled pullover on the fly with some c
rappy acrylic, which ended up fitting my roommate better than me.
After the broken leg healed I found myself laid up again with a back injury. Well, rugby’s a heck of a sport. I’ve knit pretty much all day everyday since I started. Who would have known that it would become so important to my life?
I’ve made relatively few projects from patterns, although I like to read them and incorporate ideas and techniques from others’ work. Only recently have I started to record my work and offer it to others. I’ve actually written several sweater patterns that I don’t feel confident sharing yet. Does anyone want to test knit?
Me: How long have you been designing?
Meg: I’ve been designing since I started knitting, but I only began sharing my designs about a year ago.
Me: Do you have other hobbies?Meg: I’ve practiced many textile techniques at some point, including sewing, quilting, weaving, embroidery, batik, and macramé. I crochet nearly as much as I knit now.
I love to be outdoors hiking, playing Gaelic football, or working in my garden.
Meg: I’ve just finished reading “No Logo” by Naomi Klein. It’s about the invasion of corporations into the public realm, both aesthetically and politically, and the travesty of sweatshop factories in developing countries.
While reading it I felt a bit smug about being a hand knitter. To me knitting represents a lifestyle choice. I’m proud to be a knitter, to be developing a skill to extricate my life from mass consumerism, and to be able to share this ability with the people around me. I love being a part of our knitting community – meeting people who are similar to me or different, learning constantly, and admiring the art of all of our hands.
Tuesday, October 13, 2009
Mystery Knit Along #4 Week #2
Welcome back!!
This will be the last week of this knit along. This pattern was shared with us by Meghann White. I will be doing a designer spotlight on her shortly.
Knit 8 rows or until hat measures 6 - 7 inches from brim.
(Knit 10, place marker) repeat 8 times (around 1 row of the hat).
(Knit until two stitches before the marker, K2tog, slip marker) repeat on all rows
until only 1 stitch remains before each marker.
Thread yarn through remaining stitches and tie off.
© Meghann White, for personal use only
Thank you again for joining me
Heather
Sunday, October 4, 2009
Mystery Knit Along #4 Week #1
Here is the first part of her pattern. I hope you enjoy it!!
Materials:
Cascade 220 (uses less than ½ a skein)
Size 8 16” circular needles
Gauge: 4 stitches per inch
Row 1: P1, K2, P1, K4
Row 2: P1, C2B, P1, K4
Row 3: Repeat Row 1
Row 4: P1, C2B, P1, C4B
Instructions:
Cast on 80 stitches (or some multiple of 8)
Knit 8 rows.
Fold the brim up to show the reverse stockinet, and knit through both layers to
create hem.
Follow the chart 10x for 5 repeats, plus an additional rows 1, 2, and 3.
Purl 3 rows